photo c2f2b482954a36ed8e31b3782ddbd248_zpsce020d8c.jpg Home About Me Nail Care Disclosure Contact  photo e12a381ad30282bd4f39f6f699cd8a07_zpsbaf600bc.jpg
Showing posts with label OPI. Show all posts
Tuesday, January 6, 2015

Negative Space Triangles

Hi everyone! Today I have this totally simple--but still flashy--negative space nail art to share with you! I really loved how this one turned out, and it's a look that even the most nail art challenged lacquerista. Also, I think single triangles/chevrons like the ones on my middle and index fingers are great for making short nails seem longer. 


For the chevron nails, I cut a small triangle of regular Scotch tape and applied it to a totally dried layer of topcoat. Then, I brushed a single, generous coat of OPI - Eurso Euro over top of the tape, and removed it immediately. This left me pretty clean lines, but I also cleaned up the edges a bit using a Bundlemonster striping tool. I used the same color on my pinky, and two coats of OPI - My Signature is "DC" for the accent nail.

Saturday, January 3, 2015

Polka Dots & Dance in the Rain

Happy 2015, everyone! After an extended hiatus, I am officially back in action and excited to get my blogging groove back! As I'm sure you'll notice immediately, the holidays, my crazy semester at school, and lack of sleep due to hours spent on my thesis have taken a serious toll on my talons. I am reduced to the shortest nubs I've had in over a year! But this is all part of being a polish head--breaks happen. I'm going to work on a series celebrating nubs and maybe even some tutorials (!!!) with ideas for ladies that rock shorter nails all the time.


I thought it would be best to re-enter the blogosphere with a simple, colorful look that complements my new shorter style. I started with two coats of OPI - You're So Vain-illa on my index and middle fingers, then used a small Bundlemonster dotting tool to add polka dots in OPI - Hey Baby (pink) and China Glaze - Wait N' Sea. For my ring finger and pinky, I started with a base of OPI - Love.Angel.Music.Baby, and dabbed three-ish coats of Lumina Lacquer - Dance in the Rain on my ring finger.

Tuesday, August 12, 2014

NOTD: Pastel Mermaid Nail Art

Nail babes, I have a confession to make. Since my first attempts at nail art in March 2013 and starting my blog almost a year ago, I have never...NEVER... done mermaid nails. I know, I'm a fraud; a failure. What kind of nail girl isn't obsessed with mermaids? And doesn't create mermaid-esque masterpieces on her claws to celebrate the summer? I don't know what took me so long to come to my senses as a mermaid-loving nail artist of the 21st century, but the good news is that I finally did.

Let the healing begin.


Tuesday, July 15, 2014

NOTD: Stripes, Studs, and Chevrons

My nail of the day is this girly, simple design that I did on top of a sheer white base.


I started out with four thin coats of OPI - Don't Touch My Tutu, a white crelly polish. Here I've topped it with Sally Hansen Big Matte Topcoat. I absolutely love this polish--it's perfect for a palate cleanser. Using this for the first time in a while,  I realized how much I've improved with using sheer polishes. It really does require practice!

Saturday, July 12, 2014

Stained Glass Twin Nails

Today I have a fun twin mani that I did with Tracey, also known as @missbellatracey on Instagram.


She suggested we do a neon stained glass mani, so I picked a few neon shades from my collection that would somewhat match her OPI neon set (that I totally covet! Even though they're not technically neon...they're so pretty!) I can't speak for her, but mine are WAY brighter in person, as is often the case with neons. Even with that, I think they both turned out really great!


Tuesday, June 10, 2014

Winstonia Nail Art Brush Review

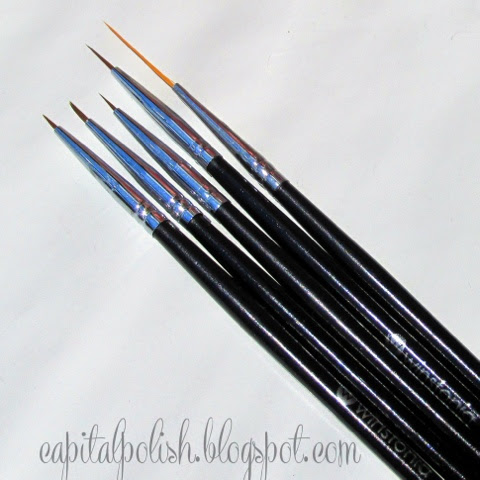
The last couple of weeks have been really great for me as far as nail art. Some of that is being out of school, giving me more time for designs, and some of it is the change in the season, which has inspired me to mirror the brightness and sunshine outside on my nails. However, a big part of my recent success is that I've been using Winstonia Professional Nail Art Brushes for most of my designs. An artist is only as strong as her tools, so I was thrilled when Winstonia contacted me about reviewing this brush set. I opted to use the brushes over a few weeks to develop a full opinion on them, which I've described in the post below!

Brushes provided for review. All polishes purchased by me.

Photo property of Winstonia. Text/arrows added by me!
I added the labels to the photo above so you'd know what I'm talking about throughout the post in reference to which brushes I use for each technique.


Since the first photo was taken from the Winstonia website, I included this photo of my actual brushes to show what they looked like upon arrival. The bristles were also encased in a plastic cover for protection.

After using these brushes multiple times over the past couple weeks, I am very impressed with their durability. I do all of my designs with polish, (mostly because I'm stubborn about using acrylic paint) so the brushes have to be cleaned in pure acetone. They have maintained their shape nicely, and don't seem to have been immediately deteriorated by the acetone.


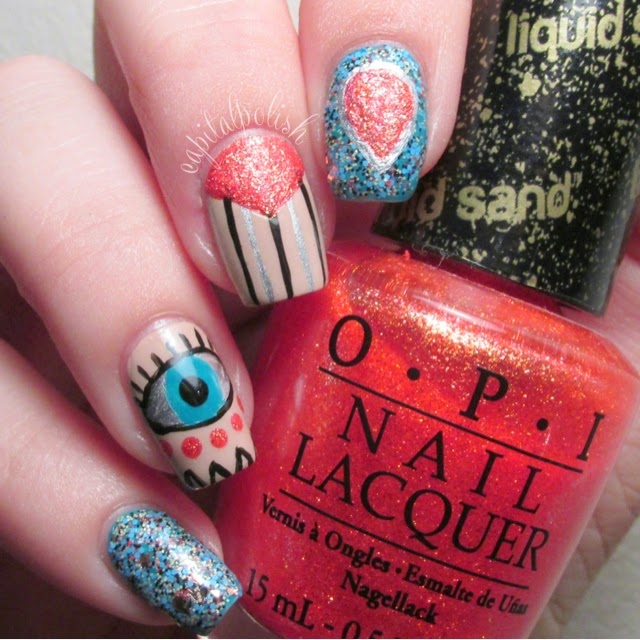
For this design, I used four of the five of the Winstonia brushes:
Striper ~ Black and silver stripes on middle finger (done using Sinful Colors - Black on Black & a-england - Excalibur)
Medium liner ~ Outline of chevron on middle finger, (done using OPI - Jinx) silver and orange outline of teardrop on index finger, outline of iris (done using OPI - Fly) and pupil in eyeball
Thin liner ~ Outline of eyeball, eyelashes, and small chevrons on index finger
Thick liner ~ used to fill in silver portion, iris, and pupil of eyeball, chevron on middle finger, and teardrop on index finger


The glitter that inspired this whole look is Milani - Sugar Rim. I was surprised to find such a wonderfully unique glitter mix at the drugstore! It includes small teal hexes, tiny yellow, black, and coral hexes, and mid-sized silver shards. All photos show two dabbed coats; on my index and pinky nail, Sugar Rim is dabbed over OPI - Fly, and on my thumb (macro above) it is over a-england - Excalibur.


The lovely Milani glitter mix reminded me of this cool bracelet I had, which was the other inspiration for this mani.


I've seen lots of people doing "evil eye" manis lately, and unfortunately, I think mine turned out a little more creepy than trendy. I love how the entire look came together, though!


Here are four other manis that I used the Winstonia brush set for over the past few weeks. Like I said, it's been a fantastic couple of weeks for me, and I definitely credit these great brushes for a lot of it! I want to mention that I used the thick liner brush to paint the orange studs on the top right mani. If you've ever tried to paint studs, you know what a pain it is to use a regular sized polish brush!


Here are the close ups. For the outline of the "V" in the top left, the light pink portion of the roses in the bottom left, and the outline, horn detail, and mane of the unicorn design in the bottom right, I used the fine detail brush. I've previously had to trim brushes to achieve such fine detail, and I loved having a brush that arrived read to complete these more detailed designs!


Overall, I was very impressed with this set. The brushes held up much better than others I've used in the past despite exposure to polish and acetone. I found the brushes easy to manipulate, and love that the bristles held their shape. Finally, I liked the variety in length and thickness, and loved that I didn't feel the need to trim the fine detail brush. 

The 5 piece Winstonia brush set, which you can get (along with lots of other beauty products) at their Website. You can also follow them on Instagram for info about promotions and giveaways!
Friday, May 30, 2014

Simple Sunflowers

Mondays are the worst, but hopefully this sunflower mani will brighten up your day a bit! I do floral designs a lot, but I realized when doing this that I've really only ever done roses or daisies. I definitely need to work on my sunflower technique, but I thought the finished product was pretty enough to share anyway.


The gradient base was done by sponging China Glaze - Too Yacht to Handle and That's Shore Bright. These are two of my favorite colors in my entire polish collection, and I especially love them together!


I used the Elmer's glue clean up method, which I have to say is one the best ideas ever. I emptied and cleaned out an old bottle of base coat I don't use, and use the brush to apply a thin coat of glue around my entire nail. The "thin" part is key if you don't want to wait around for it to dry forever. Also, you don't want to get the glue line too close to your nail--you might end up accidentally peeling off some of the polish you actually want on your nail. Then, once you're done doing the gradient, just peel the glue off! It saves your cuticles tons of acetone exposure, and who doesn't love peeling dried glue off their fingers? I distinctly remember getting in trouble in kindergarten for doing that ALL the time.  

Monday, May 26, 2014

Polish Pusher - Unicorn Sneeze

Good morning and happy memorial day to my USA nail babes! Today I have a fabulous design inspired by an even more fabulous indie polish -- Unicorn Sneeze from Polish Pusher.


Unicorn Sneeze is a vibrant, hot pink jelly polish with pink, blue, and orange small glitters and large blue holo dot glitters. These photos show three thin coats of squishy goodness, and these first three photos show it topped with HK Girl Topcoat. Without topcoat, this polish dries to a velvety, semi-matte finish. 

Wednesday, May 21, 2014

Juliet Inspired Florals

Do any of you use the app Timehop? If you don't, it's this app that you connect to your social media, then every day you get an alert of things you posted that day in past years. It's a really funny way to be reminded of how far you've come (or how old you are!) Today, I got an update that it has been SEVEN YEARS since I performed in a local theater company's production of Romeo & Juliet. I really loved theater in high school, and playing Juliet during my senior year was a great way to end my "career." 

In reminiscing back to my glory days, I realized that I, appropriately, just received Juliet by Polish Addict Nail Color in my recent order. So, I decided to use the polish and the the play as inspiration for today's mani!


This mani started with a base of Polish Addict Nail Color - Juliet on my middle and ring finger, and China Glaze - Spring in My Step on my index and thumb nail, two coats of each. Juliet is a pretty, white crelly with small gold, rose gold, and holo glitters throughout. Formula and glitter spread was ideal! The China Glaze was another story, though...application was splotchy and difficult. Without a generous coat of HK Girl Topcoat to smooth it out, it would have been a total loss. The color is certainly very pretty, though! This light, feminine color pallet set the stage (get it!) for the rest of my Juliet-themed mani.

Sunday, May 18, 2014

UVA Graduation

Hi everyone! Today I finally had a chance to post my mani from this past weekend. I was in Charlottesville, Virginia for my boyfriend's sister's graduation from the University of Virginia. I also graduated from UVA three long years ago, and I haven't been back since. I was so excited to revisit my alma mater that I did some Wahoo-themed nails.


Polishes used were Sinful Colors - Snow Me White, OPI - Eurso Euro, and a Nail Honey custom orange polish. The studs are regular gold studs from the Born Pretty Store that I painted orange using a small Winstonia brush.

Wednesday, May 14, 2014

NOTD: Hare Polish - For Margot Tenenbaum

My dear ladies and germs, (and gents, if you're out there) today I have the distinct pleasure of sharing my new favorite polish of all time with you! Without further ado, I give you a polish I love in name as much as I love on my nails, For Margot Tenenbaum by Hare Polish.


For Margot Tenenbaum is a mint/aqua jelly with gold glitters in various sizes and gold hued flakies throughout. These photos show two coats with top coat. Formula is fabulously smooth to apply, and glitter spread evenly with each stroke. This is my first polish from Hare, but it definitely lived up to its stellar reputation.


I honestly fell in love with this polish the very fist time I saw it. The color of the base is stunning, and I adore the glitter mix within. I am also obsessed with the Wes Anderson and his classic film The Royal Tenenbaums. Gwenyth Paltrow plays the sullen, emotionless Margot, the namesake of this polish, which is somewhat ironic since she's missing a finger in the movie. I think Wes would approve. 


Naturally, I had to pair this stunner with a polish that could complement its beauty without taking center stage. The lovely OPI - Love.Angel.Music.Baby. seemed an ideal choice. I honestly never get tired of the beautiful satin finish in this polish. The turquoise studs are from the Born Pretty Store, item #5603. If you order from them, be sure to use the coupon code JNJ61 for 10% off your order!


Le sigh. I don't know how I'm going to justify using any polish besides For Margot Tenenbaum from now on, because I am totally obsessed with it. Do you have a polish like that? And more importantly, do you love The Royal Tenenbaums?! (if your answer to that one is that you haven't seen it, RUN DON'T WALK and see it now! but only if you like hilarious, ironic, understated cinematic masterpieces...)
Monday, May 12, 2014

Cracked Confetti & Jelly Spots

Today I have a super bright, summer inspired mani! I've seen this sheer jelly over polka dot design all over Instagram and have been wanting to recreate it for awhile, but I also wanted to put my own twist on the design. These colors just make me want to crack open a summer ale, put on a comically large pair of sunglasses, and lounge by the pool all day!


With Sinful Colors - Endless Blue, I used a Bundlemonster striper brush to outline my nail, and a large dotting tool for the polka dots. Then, I applied a single coat of L'oreal - Miss Pixie to give a sheer layer. These two polishes went together perfectly! I'm really loving all of these jelly L'oreal polishes in general. Sheer seems to be a huge nail trend right now, and I found them all on Amazon for about $3 each. 


For the accent nail, I started with two coats of OPI - I Just Can't Cope-a-cabana from the Brazil collection. I have to say, I absolutely adore this yellow. Perfect full coverage in two coats, no undies required?! It also seems to flatter so many skin tones, which is really hard with yellows.

For the glitter gradient, I used Pinwheel Polish - Cracked Confetti. OMG! This glitter bomb is amazing. Check out the macro!


So many colors and shapes, and very festive! I think it really tied the entire thing together. For some reason, I always associate royal blue and yellow with summer. What are your go-to summer shades?
Saturday, May 10, 2014

My first Stitch Fix + inspired manis

My post today is a bit different from what I usually do, but I really hope you all enjoy the mix of fashion and nail art.

Have you heard of Stitch Fix? It's an innovative online personal styling service! Here's how it works: go to the site, fill out your style profile, and schedule a fix! That. Is. It. Within a few weeks, five items tailored to your size and style preferences will arrive in your mailbox, and you get to choose which ones get to stay in your closet. When you schedule a fix, you will be charged a $20 styling fee, which goes towards anything you keep in your box. Also, if you keep all five of the items, you receive a 25% discount on everything.


When I got the alert from my apartment building that my package had arrived, I practically sprinted home and tore into my Fix! I was immediately excited by the patterns and textures I saw, and found the personalized note from my stylist, Elle, to be a nice touch.


Your fix also comes with styling cards for each item with recommendations on what to pair each piece with. So, what was inside?!

First of all, I had specifically requested a maxi skirt or dress when I scheduled my fix. My first reaction here was conflicted: my stylist included both a skirt AND a dress (yay!) but they were also both horizontally striped (as a curvy girl who's always trying to drop 10-15 pounds...hmmm...) However, one of the cardinal rules of Stitch Fix is to try everything on, even if you think it won't work for you. So I followed the rules.


I was so surprised to find that I loved everything about the THML - Kahlo Racer Back Striped Maxi Dress ($78) dress. The pattern was (somehow!) figure flattering, the shape was surprisingly structured, and I love the pop of color and detail at the neckline. The length was also perfect, which I was concerned about since I'm on the shorter side. My only complaint about this piece was the price tag--$78 seems like a lot to spend on a dress without much structure or substance like this one.

I promised you nails, didn't I?! This mani was inspired by the dress above.

I applied two coats of OPI - My Vampire is Buff, and used a striper brush by Bundlemonster to add thin stripes of Zoya - Storm. I tried to replicate the loopy embroidery using a small detail brush and dotting tools by Bundlemonster in OPI - Live.Love.Carnaval.


Once I realized I loved the dress, I figured the similarly-styled skirt would be a definite return. Then I tried it on, along with the Fate - Antonietta Zip-Front Sleeveless Blouse as my stylist recommended:


For being, theoretically, almost identical to the dress, this is such a different look to me! The color pallet is more beachy and low key, and the shape more casual. This Honey Punch - Quincey Striped Maxi Skirt ($58) was a bit longer on me in length, but the foldover top made it adjustable to a certain degree, and I like having the option of pairing it with flats or heels. On the downside, I also found the price of this one to be a bit higher than what I would usually pay for such a simple piece.

On another note, the Fate - Antonietta Zip-Front Sleeveless Blouse ($58) is just SO me. I love white tops, I love zipper details, and I love sleeveless/tank styles that cover enough to be office appropriate, but are still wearable and fun for the weekend.

This paring also inspired a mani!

This mani began with a base of China Glaze - Too Yacht to Handle (index & middle finger) and In a Lily Bit (ring & pinky finger). I used striping tape to create the striping with Colores de Carol - 1912 and the lattice pattern with Sinful Colors - Snow Me White. I used a Bundlemonster dotting tool to enlarge the crosses to mimic the embroidery on the top.


The next item I tried was the Pomelo - Kenedy Lace Crochet & Ikat Print Dress ($78). This is so perfect for spring and summer! This length can be tricky for my shape, but the flair in the skirt balanced out my bust and hips, and adding a belt (my own, not included in the fix) really accentuated my shape. Again, I love that I could wear this to work or to Sunday brunch. The material of the skirt is so soft, and overall it just felt like a nice, well made piece.


The final item in my box was Papermoon - Wynn Arrow Print Front Pocket Blouse ($48). I had seen this on some other bloggers who reviewed their fixes, and was so excited to pull it out of my own. This style top (gauzy, loose, and 3/4 length sleeved) is such a staple in my wardrobe, since it's wearable year-round depending on how you style it. Pairing something so light and airy with a cami is a great way to prevent sweating to death in the heat of DC summer.


Even though I love the pattern and cut of the shirt in general, I wasn't totally enthused about the neckline, and it was a little small in the shoulders.

This one also inspired a nail look!

I began with a base of Cult Nails - Time Traveler (middle & index fingers) and Riot (index & pinky finger). Using a Bundlemonster striping brush, I added the chevrons in Sinful Colors - Snow Me White and Riot.


When I initially scheduled my fix, I had planned on keeping two, maybe three of the items. However, once I had all these pretty clothes in my actual home, it was reaaaally hard to imagine letting them go. Even with my misgivings about the top and some of the prices, I took the plunge and kept everything. I'm glad I didn't sign myself up for monthly fixes right away, because I could see this being a serious drain on my bank account! Luckily, the 25% discount for buying all five items made one of the dresses free. I'm definitely a Stitch Fix convert...I scheduled my next fix that same day.


What do you think? Would you like to see another post like this when I get my next fix? Or should I keep to showing my hands instead of my face? Let me know in the comments! Also, if you're interested in giving Stitch Fix a try, use this link and I'll get a referral bonus towards my next purchase!
Thursday, May 1, 2014

OPI Tribal Nails

Hi everyone! Can you believe it's May already?! I'm excited because this means I'm almost done with my first year of grad school, and will very soon have WAY more time for fun stuff, like nail painting! I only hope the weather will catch up because it is still way too cold and rainy here in DC.

Today I have this fun tribal mani to share with you, done entirely with OPI polishes. I've seen lots of tribal patterns in the blogosphere and on Instagram lately, and love this trend for spring and summer. I'm pretty limited in my artistic abilities, but I can always come up with combinations of lines a geometric shapes, and the color palettes are endless for this type of design. 


I started out with a base of My Vampire is Buff, the quintessential creamy nude shade adored by nail lovers around the world. True to OPI form, application of this polish was easy, and the finished product was a beautiful, neutral blank canvas. This is two coats topped with top coat. I was quite tempted to leave it this way.


But of course, the "more is more!" in me won that battle, especially since I haven't done much actual art lately. I used a thin Bundlemonster brush to apply Can't Find My Czechbook, Live Love Carnaval, and Love.Angel.Music.Baby for the tribal designs. Then, I topped everything with 2 coats of HK Girl Topcoat to smooth everything out. 


These tiny details took me a few hours, but I find this very therapeutic and relaxing, and I was excited to be so pleased with the finished product! I've been feeling uninspired a lot lately, and have wound up with designs that have way too much going on, or just don't flow together. Hopefully, this mani will pull me out of my rut!


Friday, February 7, 2014

Inni Nail Strips

UPDATE: Inni Nails is now on Kickstarter! Try out these fabulous and unique nail strips and help this new company reach their funding goal!

Today I'm excited to share my review of a relatively new product on the nail scene. Before I really started to get into nail art and swatching, I went through a phase where I loved incorporating nail strips into my manicures as an accent nail. Since I hadn't ever tried to create designs on my own, but I was interested in mixing things up, this was an excellent option for me. However, I quickly found that there weren't as many designs available as I had ideas in my head, and that some brands of nail strips were just difficult to work with, and didn't create the desired effect.

Enter Inni Nail Strips! Through their website, you can design your very own nail strips, or browse the many designs uploaded by other users. I was intrigued by the concept, but wondered, how would the quality stand up? Read ahead to learn more!

Product provided for review.


On the Inni website, you can access the studio, (shown above) which allows you to create your own design using a variety of tools, or to even upload an image saved on your computer. The studio was very user friendly, and I played around with a bunch of different designs before eventually choosing a pretty lavender brocade pattern that had been uploaded by a previous user.


 Soon after making my selection (much sooner than I anticipated, as they travel all the way from Finland!) my strips arrived. Here's what you get: 30 strips printed with your chosen design in varying sizes, a file for shaping the strips to your nail, and a brief set of instructions printed at the top. Very simple and sleek, and I was really pleased with the number of strips and variety of sizes provided.


Here's a close up shot of the instructions. Straightforward and easy to follow. I definitely recommend following step 1 and swiping your nails with remover before application, even if they're already clean. Doing so made the strips adhere to the nail much better. Also, I love the measurement feature that allows you to select the right size for each nail.


By matching the nail to the strip, you get a precise measurement for the width of your nail, and can choose the appropriate strip for your size (each strip is labeled by size this way). This is a feature I haven't seen with any other nail strip kits, and found it to be very helpful! They also have a Youtube video that introduces the product and walks you through the steps.


Following the included instructions, I applied a strip to each nail, and shaped using the included file. The strips were very sticky, and adhered to the nail immediately. In this picture, you can see some slight lifting at the cuticle, which I addressed by applying a coat of top coat. That worked well, and the lifting wasn't apparent in real life, just in the super zoomed in photos. I also ran finer grit nail file over my tips to remove some of the "jagged" look from shaping the strips.


Here's the finished product. Notice how the lifting is less pronounced here.


This macro shot was taken after three days of wear! They really held up great, with only slight puckering on the left side of the nail. The website states they can last up to two weeks, which I don't doubt, but we all know I can't keep the same thing on my nails for that long.  :)

As I said before, my favorite way to utilize nail design strips is as an accent nail incorporated into a more dynamic mani, so I decided to include an example here! I paired the Inni Nail Strip with white studded nails (Snow Me White - Sinful Colors, studs from the Born Pretty Store) and Love.Angel.Music.Baby from the OPI Gwen Stefani collection.


Detailed nail art in seconds, what's not to love?! I would definitely put these strips in the same category as Sally Hansen strips, which are the most user friendly brand I've used in the past. (For reference sake, the worst brand I've used is Essie -- avoid those!) Though I'd say they're similar in quality to the SH strips, these are a very different material, and were a little tricky to work with at first just because they weren't what I was used to. By following the instructions and working slowly and carefully, I was able to get the hang of it, and was very pleased with the final result. Also, unlike the SH strips, they can simply be peeled off when you're ready to remove!


Inni Nail Strips are available with free international shipping through their website for $8.90/set. There are endless possibilities for designs, and you get a lot of strips for the price! Try incorporating one or two strips into a skitlette mani, or you can cut the strips into different shapes for a whole other look. I also think this is a great marketing option for organizations or fundraisers, especially if you have a logo that would be really difficult to create using freehand techniques. Enjoy, and let me know if you try them out!

Follow Inni Nail Design on Facebook and Pinterest