photo c2f2b482954a36ed8e31b3782ddbd248_zpsce020d8c.jpg Home About Me Nail Care Disclosure Contact  photo e12a381ad30282bd4f39f6f699cd8a07_zpsbaf600bc.jpg
Showing posts with label Born Pretty. Show all posts
Tuesday, January 6, 2015

Negative Space Triangles

Hi everyone! Today I have this totally simple--but still flashy--negative space nail art to share with you! I really loved how this one turned out, and it's a look that even the most nail art challenged lacquerista. Also, I think single triangles/chevrons like the ones on my middle and index fingers are great for making short nails seem longer. 


For the chevron nails, I cut a small triangle of regular Scotch tape and applied it to a totally dried layer of topcoat. Then, I brushed a single, generous coat of OPI - Eurso Euro over top of the tape, and removed it immediately. This left me pretty clean lines, but I also cleaned up the edges a bit using a Bundlemonster striping tool. I used the same color on my pinky, and two coats of OPI - My Signature is "DC" for the accent nail.

Tuesday, August 12, 2014

NOTD: Pastel Mermaid Nail Art

Nail babes, I have a confession to make. Since my first attempts at nail art in March 2013 and starting my blog almost a year ago, I have never...NEVER... done mermaid nails. I know, I'm a fraud; a failure. What kind of nail girl isn't obsessed with mermaids? And doesn't create mermaid-esque masterpieces on her claws to celebrate the summer? I don't know what took me so long to come to my senses as a mermaid-loving nail artist of the 21st century, but the good news is that I finally did.

Let the healing begin.


Tuesday, August 5, 2014

Laquerlicious Summer Releases Swatch & Review


Hi everyone! I've been sitting on these Laquerlicious swatches for way too long, but I finally got around to writing them up. Seems like I can always make time to do my nails, but making time to edit photos and write up a post can be more difficult. I'm hoping to get better about this once I start school and am forced to mange my time better!

In case you've been living under a rock, Laquerlicious is a celebrated indie brand known for bold and eclectic glitter mixes. This is the second time I've had the opportunity to review these amazing polishes, (you can take a look at the 2013 Christmas collection and an indie maker spotlight with the maker Michelle here!) and I was thrilled to try a few more!


Polishes provided at discount for purpose of review.


Tuesday, July 15, 2014

NOTD: Stripes, Studs, and Chevrons

My nail of the day is this girly, simple design that I did on top of a sheer white base.


I started out with four thin coats of OPI - Don't Touch My Tutu, a white crelly polish. Here I've topped it with Sally Hansen Big Matte Topcoat. I absolutely love this polish--it's perfect for a palate cleanser. Using this for the first time in a while,  I realized how much I've improved with using sheer polishes. It really does require practice!

Sunday, May 18, 2014

UVA Graduation

Hi everyone! Today I finally had a chance to post my mani from this past weekend. I was in Charlottesville, Virginia for my boyfriend's sister's graduation from the University of Virginia. I also graduated from UVA three long years ago, and I haven't been back since. I was so excited to revisit my alma mater that I did some Wahoo-themed nails.


Polishes used were Sinful Colors - Snow Me White, OPI - Eurso Euro, and a Nail Honey custom orange polish. The studs are regular gold studs from the Born Pretty Store that I painted orange using a small Winstonia brush.

Wednesday, May 14, 2014

NOTD: Hare Polish - For Margot Tenenbaum

My dear ladies and germs, (and gents, if you're out there) today I have the distinct pleasure of sharing my new favorite polish of all time with you! Without further ado, I give you a polish I love in name as much as I love on my nails, For Margot Tenenbaum by Hare Polish.


For Margot Tenenbaum is a mint/aqua jelly with gold glitters in various sizes and gold hued flakies throughout. These photos show two coats with top coat. Formula is fabulously smooth to apply, and glitter spread evenly with each stroke. This is my first polish from Hare, but it definitely lived up to its stellar reputation.


I honestly fell in love with this polish the very fist time I saw it. The color of the base is stunning, and I adore the glitter mix within. I am also obsessed with the Wes Anderson and his classic film The Royal Tenenbaums. Gwenyth Paltrow plays the sullen, emotionless Margot, the namesake of this polish, which is somewhat ironic since she's missing a finger in the movie. I think Wes would approve. 


Naturally, I had to pair this stunner with a polish that could complement its beauty without taking center stage. The lovely OPI - Love.Angel.Music.Baby. seemed an ideal choice. I honestly never get tired of the beautiful satin finish in this polish. The turquoise studs are from the Born Pretty Store, item #5603. If you order from them, be sure to use the coupon code JNJ61 for 10% off your order!


Le sigh. I don't know how I'm going to justify using any polish besides For Margot Tenenbaum from now on, because I am totally obsessed with it. Do you have a polish like that? And more importantly, do you love The Royal Tenenbaums?! (if your answer to that one is that you haven't seen it, RUN DON'T WALK and see it now! but only if you like hilarious, ironic, understated cinematic masterpieces...)
Tuesday, April 8, 2014

Cherry Blossoms + Born Pretty Fleur-de-lis

Nail babes, it's official: spring has sprung! One of the most iconic signs of spring here in DC is the annual cherry blossom festival. People travel from all over the world (seriously!) to marvel at the beautiful pink trees all over Washington. Fortunately for my allergies, but unfortunately for the tourists, the blossoms have been reluctant to bloom after this year's brutal winter. They're beginning to peek out, so I figured I'd encourage them and add a little DC pride to my nails!

Fleur-de-lis nail decoration provided for review. All other polishes and tools were purchased by me.

I started out with my base colors: Sinful Colors - Snow Me White on my middle and ring fingers, a no name mint Color club on my index and pinky, and OPI - Hey Baby on my thumb. Using a small dotting tool from my Bundlemonster set, I added a polka dot pattern to the white nails. I painted the branches using OPI - My Private Jet and used a variety of dotting tools dipped in white and several shades of pink (Delush Polish - Make Me Blush & OPI - Shorts Story) to create the blooms. Then I topped it all with a thin coat from a fresh bottle (sighhh so refreshing!) of HK Girl Topcoat.


I affixed this cute fleur-de-lis charm (Item 9399 #10 from the Born Pretty Store) to my ring finger by applying an additional, thicker layer of HK Girl, and placing it using a pair of tweezers. I love how it adds some dimension and maturity to this whimsical manicure, and love the detail in the metal! You can find this and tons of other affordable nail art decorations and supplies at the Born Pretty Store--free worldwide shipping, and 10% off your order using the code JNJ61! I'll be reviewing a few other items from them this week, so stay tuned.


Overall, I'm pleased with how this mani turned out, especially after not doing much nail art in the past few weeks. I attempted cherry blossoms nearly a year ago, and I see a ton of improvement. Not only do my blossoms look a lot more complex, I like how the look is more detailed, precise, and polished. Not to mention vast improvements in my nail care routine, posing abilities, and photo quality. Just goes to show you how far practice can take you!


Friday, February 7, 2014

Inni Nail Strips

UPDATE: Inni Nails is now on Kickstarter! Try out these fabulous and unique nail strips and help this new company reach their funding goal!

Today I'm excited to share my review of a relatively new product on the nail scene. Before I really started to get into nail art and swatching, I went through a phase where I loved incorporating nail strips into my manicures as an accent nail. Since I hadn't ever tried to create designs on my own, but I was interested in mixing things up, this was an excellent option for me. However, I quickly found that there weren't as many designs available as I had ideas in my head, and that some brands of nail strips were just difficult to work with, and didn't create the desired effect.

Enter Inni Nail Strips! Through their website, you can design your very own nail strips, or browse the many designs uploaded by other users. I was intrigued by the concept, but wondered, how would the quality stand up? Read ahead to learn more!

Product provided for review.


On the Inni website, you can access the studio, (shown above) which allows you to create your own design using a variety of tools, or to even upload an image saved on your computer. The studio was very user friendly, and I played around with a bunch of different designs before eventually choosing a pretty lavender brocade pattern that had been uploaded by a previous user.


 Soon after making my selection (much sooner than I anticipated, as they travel all the way from Finland!) my strips arrived. Here's what you get: 30 strips printed with your chosen design in varying sizes, a file for shaping the strips to your nail, and a brief set of instructions printed at the top. Very simple and sleek, and I was really pleased with the number of strips and variety of sizes provided.


Here's a close up shot of the instructions. Straightforward and easy to follow. I definitely recommend following step 1 and swiping your nails with remover before application, even if they're already clean. Doing so made the strips adhere to the nail much better. Also, I love the measurement feature that allows you to select the right size for each nail.


By matching the nail to the strip, you get a precise measurement for the width of your nail, and can choose the appropriate strip for your size (each strip is labeled by size this way). This is a feature I haven't seen with any other nail strip kits, and found it to be very helpful! They also have a Youtube video that introduces the product and walks you through the steps.


Following the included instructions, I applied a strip to each nail, and shaped using the included file. The strips were very sticky, and adhered to the nail immediately. In this picture, you can see some slight lifting at the cuticle, which I addressed by applying a coat of top coat. That worked well, and the lifting wasn't apparent in real life, just in the super zoomed in photos. I also ran finer grit nail file over my tips to remove some of the "jagged" look from shaping the strips.


Here's the finished product. Notice how the lifting is less pronounced here.


This macro shot was taken after three days of wear! They really held up great, with only slight puckering on the left side of the nail. The website states they can last up to two weeks, which I don't doubt, but we all know I can't keep the same thing on my nails for that long.  :)

As I said before, my favorite way to utilize nail design strips is as an accent nail incorporated into a more dynamic mani, so I decided to include an example here! I paired the Inni Nail Strip with white studded nails (Snow Me White - Sinful Colors, studs from the Born Pretty Store) and Love.Angel.Music.Baby from the OPI Gwen Stefani collection.


Detailed nail art in seconds, what's not to love?! I would definitely put these strips in the same category as Sally Hansen strips, which are the most user friendly brand I've used in the past. (For reference sake, the worst brand I've used is Essie -- avoid those!) Though I'd say they're similar in quality to the SH strips, these are a very different material, and were a little tricky to work with at first just because they weren't what I was used to. By following the instructions and working slowly and carefully, I was able to get the hang of it, and was very pleased with the final result. Also, unlike the SH strips, they can simply be peeled off when you're ready to remove!


Inni Nail Strips are available with free international shipping through their website for $8.90/set. There are endless possibilities for designs, and you get a lot of strips for the price! Try incorporating one or two strips into a skitlette mani, or you can cut the strips into different shapes for a whole other look. I also think this is a great marketing option for organizations or fundraisers, especially if you have a logo that would be really difficult to create using freehand techniques. Enjoy, and let me know if you try them out!

Follow Inni Nail Design on Facebook and Pinterest
Monday, February 3, 2014

Gwen for OPI Triangles

I am, and have been since adolescence, a HUGE No Doubt/Gwen Stefani fan. Tragic Kingdom was my angsty soundtrack through most of middle school, and when Gwen broke out on her own, I was in awe of her artistry and ability to distinguish herself as a solo performer. Naturally, I was thrilled when I started seeing the hype of this enormous style icon's collaboration with OPI. Like many others, I was slightly disappointed when the collection was first revealed. To me, it didn't have that "it" factor, the stand out star quality that Gwen exudes 24/7, the rockstar devil-may-care attitude that spits in the face of mainstream trends.

Well, I was wrong.

After taking in the evidence through various other bloggers and keeping an eye on OPI's social media campaign around this collection, I think it actually is pretty innovative. The experimentation with different finishes sets these polishes apart, especially in what seems to be the downward slide of grainy textures. I also appreciate how OPI seems to be embracing the nail art trend by providing ornamentation with Gwen's signature shade, and the development of a nail art app. This post is me biting my tongue, acknowledging my foolishness, and maintaing that Gwen is kickass and still an innovator, as she really snuck up on me with the uniqueness of this collection.


This mani features three polishes from the collection: 4 in the Morning, Love.Angel.Music.Baby (both of which have satin finishes) and I Sing in Color (which has a glossy finish). The triangle tips were freehanded using the polish brush, and the multi-triangle accent nail was done using striping tape from the Born Pretty Store.


I really, really love the satin finish of 4 in the Morning (black, base on middle finger and triangle tip on thumb) and Love.Angel.Music.Baby (gold, base on thumb, pinky, and ring fingers, and triangle tip on index). I applied two coats of these without topcoat, as recommended. They have a subtle shimmer, are velvety to the touch, and aren't quite fully matte. I hope this finish becomes a mainstay in future OPI collections!

I Sing in Color (base on index, triangle tips on middle and pinky finger) is a deep, vampy burgundy shade, that applied smoothly and evenly with full coverage in two coats. I especially love how this stands out against the black of 4 in the Morning on my middle finger.


I initially only ordered these three and one other polish from this collection, but after falling so entirely in love with them, I might need to pick up more. What do you think of the Gwen for OPI collection? Has it grown on you as it has on me?
Monday, January 20, 2014

The Nail Rock Glitter Sequin Kit

Happy MLK Day! It's very rare that I have a holiday from both work AND school, so I'm really enjoying my long weekend...by doing lots of nail looks! Today I used one of my Birchbox samples, The Nail Rock glitter sequin kit, to create one of my most sparkly accent nails yet!


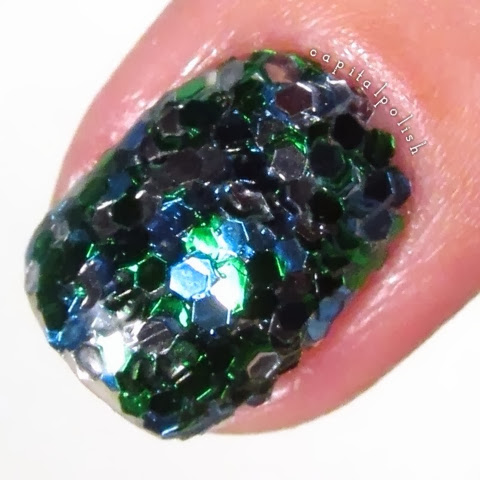
The Nail Rock kit comes with a pot of glitter, (mine was a mixture of green, aqua, and silver) a special glitter-grabbing base coat, and a brief set of instructions. I applied one coat of the base coat over my normal base of Nailtiques 2, then rolled my finger in the glitter pot. I used my regular clean up brush to brush away excess glitter, then topped with HK Girl Topcoat to seal everything in and give it a high gloss. I paired this outrageous accent nail with a somewhat subdued gradient of Zoya Chantal and Hunter, and added circular silver studs from the Born Pretty Store. 


Though I'm not totally crazy about these two looks in combination, (the greens matched MUCH better in my head!) I do enjoy them independently. I've never done a full loose-glitter nail accent before, and it's a really simple way to get a super fabulous look. I do like the combination of glitter, and it was a good size for this type of application, and could also be used in glitter placement. The base coat that comes in the kit smells AWFUL, almost like superglue. It picked up a lot of glitter, but it took a long time to dry and gave me a headache. If I try this again, I will probably just use my normal basecoat. Also, by that logic, you're probably better off just buying individual pots of loose glitter (available for cheap from craft stores or the Born Pretty Store) rather than dropping $7 on this kit. 

Macro shot of my glitter nail. Again, I do like the look, and I'll probably do it again, and even look into buying more loose glitter to experiment. The base coat that came with the kit is going in the trash.

The Nail Rock glitter sequin kit is available from Birchbox, and comes in a few other colors and finishes, including velvet and microglitter. If you're interested in receiving monthly samples from Birchbox for only $10, sign up here!

Saturday, November 16, 2013

Delush Polish - Slice of Life Collection

Today I have a compilation of all of the swatches I've done over past few weeks using the Slice of Life collection by Delush Polish! I was a Dexter fangirl from the very beginning through the brutal, bitter end, and I am physically unable to resist any collections referencing or inspired by pop culture references relevant to my life. I ordered this full collection in minis so I could try them all, and truly fell in love with each one! 

WARNING: This post is going to be littered with Dexter references. Non-watchers proceed with caution!

Born in Blood
This was my Halloween mani! What's more terrifying than Dexter's origins? It's a bright red jelly polish with red dot and hex glitters in varying sizes, and scattered holo micro glitters. Photo shows three thin coats topped with Seche Vite. As I did with all of these polishes, I stored this one upside down for about 10 minutes before use, and had no trouble getting even coverage and easy distribution of glitters.

A Very Neat Monster
Black jelly glitter polishes have my heart forever! This one has small square glitters in varying shades of green, bright green microglitters, and big green holo dots. Photo shows two coats topped with Seche Vite. I paired this polish with Black in Mirrors from the Maybelline Color Show Brocades collection, and a cool shaped stud accent from the Born Pretty Store.

Here's a close up. Swatching these reminded me how desperately I need a macro lense! Will you look at those big dots?! Be still my heart. Again, no fishing for glitters, and easy full coverage in two coats. This is might be my favorite from the collection!

Dark Passenger
This polish is a dark blue-green jelly with hex and microglitters in a variety of colors. Photo shows three coats topped with Seche Vite. This one is super buildable and squishy! The color of the base jelly is very unique, and definitely appropriate for embodying Dexter's twisted and mysterious compulsion to kill.

Here's a close up that captures the complexity of the glitters in this one better. Again, I NEED A MACRO LENSE!!

Time to Kill
This polish is a really nice complement to Dark Passenger. It features rosy-hued dot, hex, micro, and square glitters in a plum jelly base. My middle and index finger show three layered coats topped with Seche Vite, and the index and pink show one coat over a subtle metallic gradient.

Angel of Death
This dark and mysterious polish really impressed me. It contains white and red microglitters, and larger white and grey hex glitters suspended in a black jelly. I love how the lighter glitters stand out even with multiple layers of the black polish (photo shows three thin coats). I paired it with China Glaze - Ruby Pumps to highlight the red microglittters. 
Also, please forgive me for that terrible piece of fuzz on my pinky. I didn't see it until I had already removed the polish and was editing photos!

Tonight's the Night
Another front runner for my favorite polish in the collection! Again, three cheers for black jellies! This polish calls to mind the many scenes showing Dexter prowling the Miami area for targets, neon lights ever present in the background. And those big holo dots! I die. 

Master of Disguise
Last but certainly not least is this fabulous mix of gold, orange, and copper glitters in a chocolate jelly base. This polish is so incredibly unique! Like the others, application was easy and even, and I loved the look achieved by layering this polish. This is my third pick for favorite in the collection. :)

Close up shot to really show the complexity of this glitter. So beautiful!

These and other masterful indie collections are currently available on the Delush website. You can also follow Delush on instagram.

Tuesday, October 8, 2013

Paint Job Nail Lacquer Swatches & Art

Today I have some polishes to share with you that I recently picked up from Paint Job Nail Lacquer. When I first began my trip down the rabbit hole of polish addiction, Paint Job was one of the first indies I found on Instagram. Their polishes were unique, cleverly named, (they entire line follows a car theme) and had a ton of variety and options. I don't know why it took me so long to add some Paint Job polishes to my collection, but I must say they were certainly worth the wait!

Junk in the Trunk
A neon pink jelly packed with multicolored square and hex glitters, show here with three thin coats with no top coat.
When I first received this polish, I instinctively tried it (on one finger) over a white base, which I usually love, especially for neons, but it really didn't work with this particular shade of pink. Pairing with white, in my opinion, hid some of the complexity of the glitters (there really are SO many in here!) and just made the whole look kind of juvenile. I think it would be adorable over white on someone younger, but for me, I'll stick with the squishy, jelly look for this one. 

The amount of pigment in the jelly base made this polish easily buildable, and with the amount of glitter, you could definitely get way with one even coat for a more subtle, sheer look.

Overdrive
A bright royal blue jelly with blue and iridescent glitters in varying sizes. Shown with two coats over Sally Hansen - Blue Me Over on every nail except the index, which is three coats on its own. My camera really dropped the ball on capturing this one; you can see the complexity of the polish much better in the bottle here, but in real life it transfers to the nail beautifully. As with Junk in the Trunk, I was surprised to find that I preferred this one without undies as well, though the blue base really does make the color pop!

Camber
A deep charcoal crelly packed with silver and holo microglitters. It might actually be more of a jelly, but it's so pigmented that I achieved full coverage in two easy coats without a base. This one is definitely my favorite--a perfect fall shade, but it's a lot more interesting to look at than basic black. 

Being a neutral, but still complex, Camber is perfect for incorporating into nail art without being too flashy or over the top.

Here, I added some gold studs and accents of Lacquerlicious - Glittery Glam. The multicolored shards in Glittery Glam were the perfect complement to the rainbow of holo the Camber reveals in the sun.

This one is a somewhat abstract interpretation of turquoise, inspired by these lovely studs from the Born Pretty Store. I applied the studs using Seche Vite over a base of Milani - Almond Bliss, and did triangle accents of using Camber over OPI - Fly. One of my instabuddies was clever enough to coin the phrase "macroise" to describe this (like macro turquoise? get it?!) but I also like meta-quoise, (as in meta-turquoise) because there's actual turquoise, and also the abstract version, and....I'm a nerd. Hope you like it :)

All of these polishes are currently available from Paint Job Nail Lacquer, and you can follow them Instagram for promotions and new releases!
Sunday, September 22, 2013

Week in Review

Hi lovelies!
So hopefully I can get my life together to have content coming out more regularly, but this week and weekend have been crazy! Luckily I've still managed to keep my nails looking pretty nice...

Space Dust by Squishy Face Polish
Last week I posted my swatch of Polaris, which was just perfect, so here is the other polish I chose from the Squishy Face Polish "Cosmic" fall collection. This one is a purple crelly packed with lots of multi colored and holo glitters in various shapes and sizes. Application of this beauty was PERFECT! Easy, buildable coverage and no fishing for those gorgeous circle glitters! This indie gets my 100% stamp of approval with zero reservations!

Nude Lace Pattern Nails
I love nude polishes, and sparkles, so I just had to combine a few (OPI - DS Classic, Honey Ryder, and Don't Pretzel My Buttons) to create this very lady like mani. I was surprised how easy it was to do the lace pattern using a dotting tool and a small nail art brush--I think I'll recreate for a tutorial sometime soon! Black detail was added using Sinful Colors - Black on Black, and glitter placement was done using Essie - A Cut Above.

OPI - Sprung
A simple swatch of this lovely, coppery metallic with gold microglitters. Photo below (while not-so-great quality) shows how different this polish looks in different lighting!


And finally....I joined the cult!
Geometric shapes featuring Cult Nails - Riot & Time Traveler

I can't believe how long I waited to bring Cult Nails' polishes into my life! Application of these beauties was perfect, and the shades are so vibrant and gorgeous. I used a coat of Wet'n'Wild - A Blank Canvas and striping tape to create the color block chevrons, and applied 3D nail art shapes from the Born Pretty Store using Seche Vite. Pink is Sally Hansen - Back to the Fuschia.