photo c2f2b482954a36ed8e31b3782ddbd248_zpsce020d8c.jpg Home About Me Nail Care Disclosure Contact  photo e12a381ad30282bd4f39f6f699cd8a07_zpsbaf600bc.jpg
Showing posts with label Winstonia. Show all posts
Tuesday, July 15, 2014

NOTD: Stripes, Studs, and Chevrons

My nail of the day is this girly, simple design that I did on top of a sheer white base.


I started out with four thin coats of OPI - Don't Touch My Tutu, a white crelly polish. Here I've topped it with Sally Hansen Big Matte Topcoat. I absolutely love this polish--it's perfect for a palate cleanser. Using this for the first time in a while,  I realized how much I've improved with using sheer polishes. It really does require practice!

Saturday, July 12, 2014

Stained Glass Twin Nails

Today I have a fun twin mani that I did with Tracey, also known as @missbellatracey on Instagram.


She suggested we do a neon stained glass mani, so I picked a few neon shades from my collection that would somewhat match her OPI neon set (that I totally covet! Even though they're not technically neon...they're so pretty!) I can't speak for her, but mine are WAY brighter in person, as is often the case with neons. Even with that, I think they both turned out really great!


Tuesday, June 17, 2014

Picture Polish Inspired Colorblocking

Hi everyone! Today I have this edgy color blocked mani inspired by the Picture Polish Urban Shades. If you're not familiar with Picture Polish, it's a renowned indie brand made in Australia. They're famous for their flawless formula, unique shades, and collaboration with and support of nail bloggers. When I first saw their recent Urban Shades, I was immediately in love. Unfortunately, I'm American, which makes these elusive shades much more difficult to come by and, more notably, extremely pricey!


I simply couldn't justify splurging for the entire collection...but I was lucky enough to find half of the collection through a destash sale! Chillax is a bright aquamarine cream that applied beautifully. Swagger is a cool, periwinkle blue with a similarly flawless formulation. 


Chillax was definitely my favorite in the collection, so I was especially thrilled to have found this one!


Since I had found the first half of the collection for such a reasonable price, I considered taking the plunge and picking up the other two for full price. Then I happened upon some *possible* dupes for the rest of the collection with a much more affordable price tag. What do you think?

Photos property of Picture Polish; swatches by Lacquertude.

Bonkers is a burgundy creme, and Totes is a pastel orange that reminds me of creamsicles. 


Rimmel London - Simply Sizzling is a vibrant magenta shade that echoes Bonkers--somewhat. It's not as dark, and definitely warmer in tone. Rimmel London - Reggae Splash, however, looks like an almost exact dupe for Totes. I think these two polishes work well with the Picture Polish shades, and fills the void (sort of) that was left by only picking up half of the collection. I have to say that I was impressed with the formula of the Rimmel polishes; I had never used them before. 


I accented this funky design with a metallic gold pinky using Sally Hansen Color Foil - Liquid Gold. The formula was somewhat tricky to work with, but I love the metallic look. I have to restrain myself from picking up the rest of this collection.

For the design, I started with a single coat of Essie - BlancI then applied a thin layer of Seche Vite to speed the dry time. While I waiting for the base to dry completely, I applied two generous coats of Liquid Gold to my accent nails (pinky on right hand, index and middle finger on my left). I used striping tape from the Born Pretty Store to create the color blocks, and my medium sized liner brush from the Winstonia store to fill them in using all four shades reviewed above. Then, using a Bundlemonster dotting tool and my Winstonia detail brush, I added polka dots and zig zags to a few of the blocks using Blanc. I topped everything off with a coat of HK Girl Topcoat.


What do you think? Am I kidding myself with these "dupes?" 
Tuesday, June 10, 2014

Winstonia Nail Art Brush Review

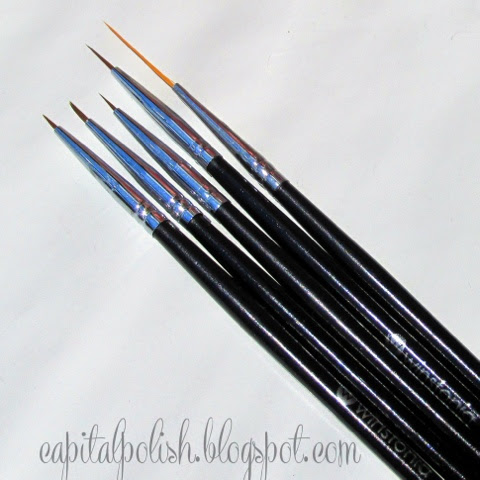
The last couple of weeks have been really great for me as far as nail art. Some of that is being out of school, giving me more time for designs, and some of it is the change in the season, which has inspired me to mirror the brightness and sunshine outside on my nails. However, a big part of my recent success is that I've been using Winstonia Professional Nail Art Brushes for most of my designs. An artist is only as strong as her tools, so I was thrilled when Winstonia contacted me about reviewing this brush set. I opted to use the brushes over a few weeks to develop a full opinion on them, which I've described in the post below!

Brushes provided for review. All polishes purchased by me.

Photo property of Winstonia. Text/arrows added by me!
I added the labels to the photo above so you'd know what I'm talking about throughout the post in reference to which brushes I use for each technique.


Since the first photo was taken from the Winstonia website, I included this photo of my actual brushes to show what they looked like upon arrival. The bristles were also encased in a plastic cover for protection.

After using these brushes multiple times over the past couple weeks, I am very impressed with their durability. I do all of my designs with polish, (mostly because I'm stubborn about using acrylic paint) so the brushes have to be cleaned in pure acetone. They have maintained their shape nicely, and don't seem to have been immediately deteriorated by the acetone.


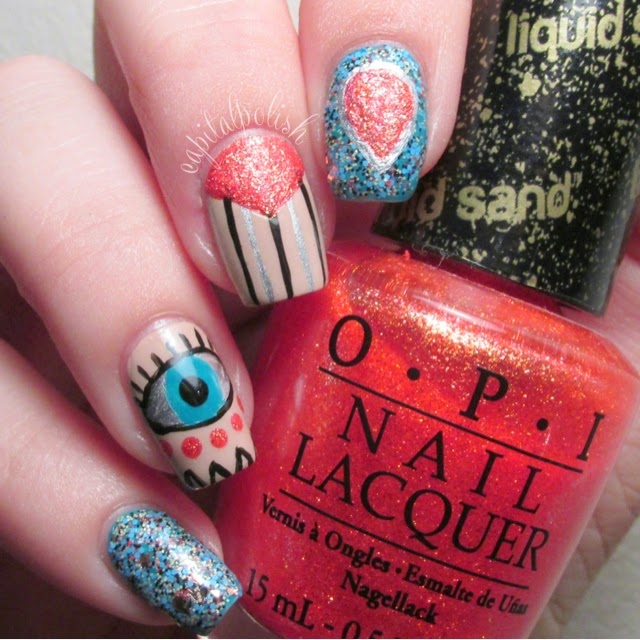
For this design, I used four of the five of the Winstonia brushes:
Striper ~ Black and silver stripes on middle finger (done using Sinful Colors - Black on Black & a-england - Excalibur)
Medium liner ~ Outline of chevron on middle finger, (done using OPI - Jinx) silver and orange outline of teardrop on index finger, outline of iris (done using OPI - Fly) and pupil in eyeball
Thin liner ~ Outline of eyeball, eyelashes, and small chevrons on index finger
Thick liner ~ used to fill in silver portion, iris, and pupil of eyeball, chevron on middle finger, and teardrop on index finger


The glitter that inspired this whole look is Milani - Sugar Rim. I was surprised to find such a wonderfully unique glitter mix at the drugstore! It includes small teal hexes, tiny yellow, black, and coral hexes, and mid-sized silver shards. All photos show two dabbed coats; on my index and pinky nail, Sugar Rim is dabbed over OPI - Fly, and on my thumb (macro above) it is over a-england - Excalibur.


The lovely Milani glitter mix reminded me of this cool bracelet I had, which was the other inspiration for this mani.


I've seen lots of people doing "evil eye" manis lately, and unfortunately, I think mine turned out a little more creepy than trendy. I love how the entire look came together, though!


Here are four other manis that I used the Winstonia brush set for over the past few weeks. Like I said, it's been a fantastic couple of weeks for me, and I definitely credit these great brushes for a lot of it! I want to mention that I used the thick liner brush to paint the orange studs on the top right mani. If you've ever tried to paint studs, you know what a pain it is to use a regular sized polish brush!


Here are the close ups. For the outline of the "V" in the top left, the light pink portion of the roses in the bottom left, and the outline, horn detail, and mane of the unicorn design in the bottom right, I used the fine detail brush. I've previously had to trim brushes to achieve such fine detail, and I loved having a brush that arrived read to complete these more detailed designs!


Overall, I was very impressed with this set. The brushes held up much better than others I've used in the past despite exposure to polish and acetone. I found the brushes easy to manipulate, and love that the bristles held their shape. Finally, I liked the variety in length and thickness, and loved that I didn't feel the need to trim the fine detail brush. 

The 5 piece Winstonia brush set, which you can get (along with lots of other beauty products) at their Website. You can also follow them on Instagram for info about promotions and giveaways!
Friday, May 30, 2014

Simple Sunflowers

Mondays are the worst, but hopefully this sunflower mani will brighten up your day a bit! I do floral designs a lot, but I realized when doing this that I've really only ever done roses or daisies. I definitely need to work on my sunflower technique, but I thought the finished product was pretty enough to share anyway.


The gradient base was done by sponging China Glaze - Too Yacht to Handle and That's Shore Bright. These are two of my favorite colors in my entire polish collection, and I especially love them together!


I used the Elmer's glue clean up method, which I have to say is one the best ideas ever. I emptied and cleaned out an old bottle of base coat I don't use, and use the brush to apply a thin coat of glue around my entire nail. The "thin" part is key if you don't want to wait around for it to dry forever. Also, you don't want to get the glue line too close to your nail--you might end up accidentally peeling off some of the polish you actually want on your nail. Then, once you're done doing the gradient, just peel the glue off! It saves your cuticles tons of acetone exposure, and who doesn't love peeling dried glue off their fingers? I distinctly remember getting in trouble in kindergarten for doing that ALL the time.  

Monday, May 26, 2014

Polish Pusher - Unicorn Sneeze

Good morning and happy memorial day to my USA nail babes! Today I have a fabulous design inspired by an even more fabulous indie polish -- Unicorn Sneeze from Polish Pusher.


Unicorn Sneeze is a vibrant, hot pink jelly polish with pink, blue, and orange small glitters and large blue holo dot glitters. These photos show three thin coats of squishy goodness, and these first three photos show it topped with HK Girl Topcoat. Without topcoat, this polish dries to a velvety, semi-matte finish.