photo c2f2b482954a36ed8e31b3782ddbd248_zpsce020d8c.jpg Home About Me Nail Care Disclosure Contact  photo e12a381ad30282bd4f39f6f699cd8a07_zpsbaf600bc.jpg
Showing posts with label tape mani. Show all posts
Tuesday, January 6, 2015

Negative Space Triangles

Hi everyone! Today I have this totally simple--but still flashy--negative space nail art to share with you! I really loved how this one turned out, and it's a look that even the most nail art challenged lacquerista. Also, I think single triangles/chevrons like the ones on my middle and index fingers are great for making short nails seem longer. 


For the chevron nails, I cut a small triangle of regular Scotch tape and applied it to a totally dried layer of topcoat. Then, I brushed a single, generous coat of OPI - Eurso Euro over top of the tape, and removed it immediately. This left me pretty clean lines, but I also cleaned up the edges a bit using a Bundlemonster striping tool. I used the same color on my pinky, and two coats of OPI - My Signature is "DC" for the accent nail.

Tuesday, April 15, 2014

NOTD: Pinwheel Polish - Fiesta Night Parade

Hi everyone! Since I got settled into my new place, I've gone on a serious nail polish ordering spree, making it really easy to be inspired (and to want to do my nails all the time!) Today's mani features a new polish that I just received yesterday, but I had to rip into it immediately.


Pinwheel Polish - Fiesta Night Parade is a clear based glitter topper with a beautiful variety of teal, pink, green, and holo glitters. These photos show two dabbed coats sandwiched between layers of L'oreal - Lilac Coolers. Glitter application was very even. As usual, I sat the bottle upside down before polishing, and gave it a good shake between coats. The bigger glitters were super easy to grab.


I've been really wanting to expand my collection of non-glitter jellies lately, and after doing some reading on the OPI Sheer Tints and the Sally Hansen Triple Shine jelly collection, I determined that neither really fit the bill for what I was looking for. My research led me to the limited edition collection of L'oreal jellies--I immediately threw six of them into my Amazon cart. This is the first one I've used, and the formula was fantastic! I applied two thin coats to each nail, then alternated layers of glitter and the jelly to get this look. My ring finger has three layers of the jelly polish topped with Zoya - Liberty in a taped design.


This is a really gorgeous and dynamic glitter topper, and I could imagine it looking fabulous with a lot of different base colors. I was forced into buying immediately when I saw a swatch of it over black--that might have to be the next combination I try!


Just look at the squish! Nom nom nom


Obviously, I had to try this one out with matte top coat. I was not disappointed! I love how the jelly polish takes on a frosty look when mattefied. 


Janna of Pinwheel Polish was also kind enough to offer a mini cuticle oil with purchase on the day I ordered. I opted for the "candy" scent--it smells just like rock candy! It seems to be a "dry oil," meaning that the aftermath of application isn't sticky or overly greasy. I'm a total cuticle care junkie, so I'm happy to add this little beauty to my collection.

The full Fiesta San Antonio collection is available from Pinwheel Polish right now. I love that this is one of the more affordable indie lines, so if you're on a budget, definitely take a look at what Pinwheel has to offer! Also, if you're a jelly fiend like me, be sure to scope out the L'oreal Miss Candy collection on Amazon; I was able to find all of them for $3 each or less!
Wednesday, February 26, 2014

St. Patrick's Day Round 1 + X Striping Tutorial

I have two more untrieds to share with you in tonight's mani, and a tutorial for my X-design accent nail. This is my first stab at a St. Patrick's Day manicure, and I love how it turned out! I'm a birthday shamrock princess, so I always get really into my green looks. I think I'll end up trying to incorporate gold rather than silver in my final birthday design, but this was a great start!


Here's the tutorial for my accent nail. It's totally simple, and really doesn't require hardly any skill--just a steady hand and some patience! But I was asked to make one by a few people, so I figured why not?!

1. Paint your base color, and let it dry completely. I used Zoya - Neely (untried #1!)
2. I like to cut all my tape before getting started. Depending on how many X's you want, cut enough medium and small-sized pieces, plus some extras just in case. I got my striping tape from the Born Pretty Store.
3. Start with a single X dividing your entire nail. 
4 & 5 Add smaller V's within each quadrant of the X. 
6. If you want to add a second X, do so where you have space. Sometimes I skip this step if I'm in a hurry.


7. Apply one coat of your second color to the entire nail. Go for an opaque color that won't require multiple coats, since you want to remove the tape before it dries.
8. Carefully remove the tape using tweezers.
9. Clean up, top coat, and you're all done!


The other nails are a subtle gradient using Sinful Colors - Snow Me White and Zoya - Neely, topped with The Juicebox Lacquer - Nobody Likes You When You're Dead (untried #2!) 

Have you been sharing your untrieds with Rei and I on Instagram? Only two more days to join us on the #hiveminduntrieds tag for a chance to win some nail goodies!


Sunday, December 1, 2013

November Nail Art Round Up

November was the first month in quite a while that I was able to make time for a good amount of nail art...unfortunately, I wasn't quite as good at making time to blog about my designs. So here's a review of some of my favorite manis from November!


Striping tape accents featuring Mermaid Lacquer - Nude Beach and OPI DS - Extravagance.


Peacock gradient nails featuring China Glaze - Too Yacht to Handle & That's Shore Bright and OPI - Fly topped with Nail Honey - All Gold Errthang and some gold studs! These were definitely my favorite this month.


Neon leopard print with China Glaze - Yellow Polka Dot Bikini and OPI - Don't Pretzel My Buttons. Fierce!


My Catching Fire nails! Featuring Painted Polish - Girl on Fire & District 12 and Hunger Games inspired details.

Which was your favorite?! Let me know in the comments! And be sure to follow me on instagram for more!
Saturday, August 31, 2013

Monthly Mani Faves - August

Here are my favorite manis from August!
Tape & Vertical Gradient
Orange (a custom Nail Honey - Burned Out) and teal (OPI - Fly) vertical gradients with Orly - Luxe topped with Nail Honey - All Gold Errthang and a quilted accent nail using tape.

Fine Art
Nails inspired by iconic works by Mondrian, Picasso, Van Gogh, and Magritte. Palette on thumb contains all polishes used!

Neon Tribal
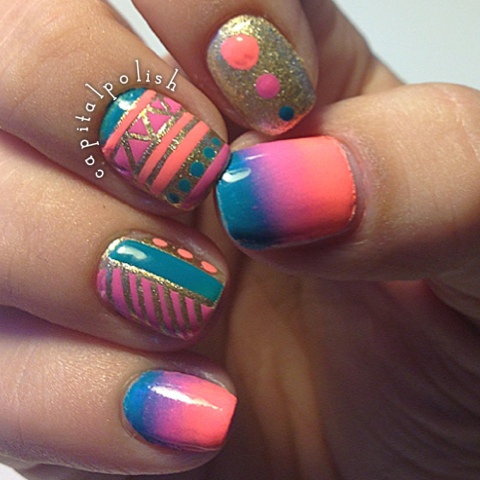
Used China Glaze - Flip Flop Fantasy, Sinful Colors - 24/7, and OPI - Fly for the gradients, gold base nails are OPI - Honey Ryder. Used striping tape, dotting tools, and a tiny nail art brush for the designs.

2 Step Galaxy Nails
Sally Hansen - Endless Blue topped with Color Club - Covered in Diamonds.

What were your faves from August?