photo c2f2b482954a36ed8e31b3782ddbd248_zpsce020d8c.jpg Home About Me Nail Care Disclosure Contact  photo e12a381ad30282bd4f39f6f699cd8a07_zpsbaf600bc.jpg
Showing posts with label texture. Show all posts
Monday, July 14, 2014

Dainty Digits Polish Swatch & Review

Tonight I have swatches of some polishes by Dainty Digits Polish, a new-to-me indie brand. After a hiatus, Anetress has recently reopened her shop, to the joy of polish addicts everywhere. I was so excited when she reached out to me to review some of her products and promote the store's reopening. I was surprised by the variety that she sent me, and impressed that she has developed the ability to create so many different types of polish so very well!


Polishes provided for review.

Tuesday, June 10, 2014

Winstonia Nail Art Brush Review

The last couple of weeks have been really great for me as far as nail art. Some of that is being out of school, giving me more time for designs, and some of it is the change in the season, which has inspired me to mirror the brightness and sunshine outside on my nails. However, a big part of my recent success is that I've been using Winstonia Professional Nail Art Brushes for most of my designs. An artist is only as strong as her tools, so I was thrilled when Winstonia contacted me about reviewing this brush set. I opted to use the brushes over a few weeks to develop a full opinion on them, which I've described in the post below!

Brushes provided for review. All polishes purchased by me.

Photo property of Winstonia. Text/arrows added by me!
I added the labels to the photo above so you'd know what I'm talking about throughout the post in reference to which brushes I use for each technique.


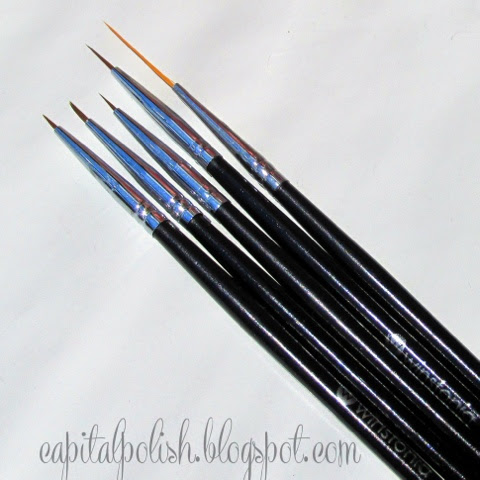
Since the first photo was taken from the Winstonia website, I included this photo of my actual brushes to show what they looked like upon arrival. The bristles were also encased in a plastic cover for protection.

After using these brushes multiple times over the past couple weeks, I am very impressed with their durability. I do all of my designs with polish, (mostly because I'm stubborn about using acrylic paint) so the brushes have to be cleaned in pure acetone. They have maintained their shape nicely, and don't seem to have been immediately deteriorated by the acetone.


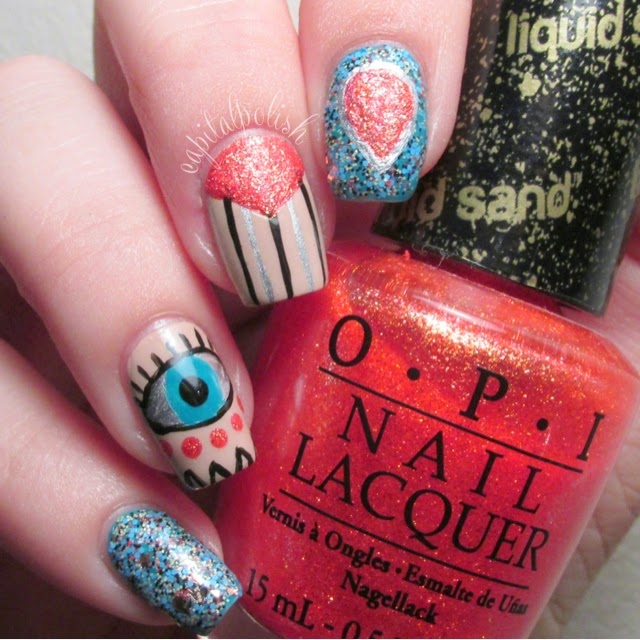
For this design, I used four of the five of the Winstonia brushes:
Striper ~ Black and silver stripes on middle finger (done using Sinful Colors - Black on Black & a-england - Excalibur)
Medium liner ~ Outline of chevron on middle finger, (done using OPI - Jinx) silver and orange outline of teardrop on index finger, outline of iris (done using OPI - Fly) and pupil in eyeball
Thin liner ~ Outline of eyeball, eyelashes, and small chevrons on index finger
Thick liner ~ used to fill in silver portion, iris, and pupil of eyeball, chevron on middle finger, and teardrop on index finger


The glitter that inspired this whole look is Milani - Sugar Rim. I was surprised to find such a wonderfully unique glitter mix at the drugstore! It includes small teal hexes, tiny yellow, black, and coral hexes, and mid-sized silver shards. All photos show two dabbed coats; on my index and pinky nail, Sugar Rim is dabbed over OPI - Fly, and on my thumb (macro above) it is over a-england - Excalibur.


The lovely Milani glitter mix reminded me of this cool bracelet I had, which was the other inspiration for this mani.


I've seen lots of people doing "evil eye" manis lately, and unfortunately, I think mine turned out a little more creepy than trendy. I love how the entire look came together, though!


Here are four other manis that I used the Winstonia brush set for over the past few weeks. Like I said, it's been a fantastic couple of weeks for me, and I definitely credit these great brushes for a lot of it! I want to mention that I used the thick liner brush to paint the orange studs on the top right mani. If you've ever tried to paint studs, you know what a pain it is to use a regular sized polish brush!


Here are the close ups. For the outline of the "V" in the top left, the light pink portion of the roses in the bottom left, and the outline, horn detail, and mane of the unicorn design in the bottom right, I used the fine detail brush. I've previously had to trim brushes to achieve such fine detail, and I loved having a brush that arrived read to complete these more detailed designs!


Overall, I was very impressed with this set. The brushes held up much better than others I've used in the past despite exposure to polish and acetone. I found the brushes easy to manipulate, and love that the bristles held their shape. Finally, I liked the variety in length and thickness, and loved that I didn't feel the need to trim the fine detail brush. 

The 5 piece Winstonia brush set, which you can get (along with lots of other beauty products) at their Website. You can also follow them on Instagram for info about promotions and giveaways!
Sunday, May 4, 2014

NOTD: Ladylike Golden Tones for Rei!

I have a special nail-of-the-day to share that was inspired by my numero uno nailbabe, Rei of Reinovate Nails! It's her birthday today, so I tried to channel her in my mani. To me, Rei's work screams class and simplicity, when she's not blowing me away with her mind boggling stamping skills. For some reason, I am unreasonably terrified of trying stamping, so I had to go the clean and simple route. I also wanted something that called to mind how wonderful and ladylike (lol) she always is. I'm really pleased with what I ended up with!


I combined Fancy Gloss - Golden Swan with Zoya - Godiva. I used two coats of each, and topped Golden Swan with HK Girl Topcoat. 


Fancy Gloss is a new to me indie brand, and I was very impressed with the quality! The polish has tons of silvery, gold, and holo glitters in a white crelly base, and I loved how much glitter I picked up in each stroke.


Godiva was one of the first Zoya polishes I ever bought, and it remains one of my ultimate favorites. I'm a total sucker for nudes, and this one is so understated and classy. Even though I've moved past my obsession for texture polishes, they definitely still have a special spot in my collection. Again, I'm often inspired by how Rei combines texture with glossy polishes for a really dynamic look.


If you've been following Rei for any length of time, (which, if you're not, what's wrong with you?! Find her here or here!) you'll know that her signature pose has caught out like wildfire all over the Instagram nail community. I love this photo style, and especially love when I see others using it and giving Rei credit for the idea. It's such a unique way to showcase the polish!


Wednesday, February 12, 2014

Delush Polish XOXO Collection

Hi everyone! Today I have some nail art to share with you that I created from two polishes I ordered from the Delush Polish XOXO Collection. I absolutely love this indie line, and have been wanting to order from her again ever since my obsession with her Dexter-inspired Slice of Life Collection began in the fall. These polishes come from a trio of pretty Valentine's themed shades that are girly and so unique!


Je Ne Sais Quoi is a white crelly polish with pastel pink and green glitters and large pink holo dots. These photos show three thin coats with two coats of HK Girl Topcoat on my index and pinky fingernails. This is the polish that literally forced me to order from Delush again--I saw some gorgeous swatches, and knew it had to be mine! Formula was wonderful, the polish applied evenly, and I didn't even have to dig for those big circle glitters that I love so dearly.


Macro shot to show the squish. And the light caught the holo at a really nice angle here, too!


Make Me Blush is a stunning, soft pastel pink with gold hued iridescent shimmer throughout. I tried so desperately to capture the gold, but eventually my camera battery died. Seriously. It's soooo incredibly pretty and feminine in real life. Photo shows two thin coats topped with HK Girl Top Coat under the rose design on my middle finger (and on my thumb that you can get a peek of in some of these photos!) This is the first glitter-free polish I've tried from Delush, and it applied like butter. I was also not sure how opaque this polish would be, and found that it build much quicker than I anticipated. 


This macro is terrible, but catches some of that gold. Honestly, you should all just buy this polish now so you can fully experience it. You will love it!


My accent nail is a Julie G textured glitter, (no name on the bottle) and I happened to have it right next to Je Ne Sais Quoi on my desk. When I realized it perfectly matched the pink glitters, I had to combine the two for the look! I also used the Julie G and Sinful Colors - Snow Me White for the roses, and Zoya - Wednesday for the little petals. 


These polishes, along with the third in the trio (which is Beyonce inspired, so sassy I love it) are available from Delush Polish right now!