photo c2f2b482954a36ed8e31b3782ddbd248_zpsce020d8c.jpg Home About Me Nail Care Disclosure Contact  photo e12a381ad30282bd4f39f6f699cd8a07_zpsbaf600bc.jpg
Sunday, January 26, 2014

Glam Polish - Maleficent


I swatched Maleficent by Glam Polish a few weeks ago, but never got around to posting the pictures. This polish is absolutely breathtaking, and finding the unused photos of this made me want to slap it right back onto my nails! It also really made me miss my long pretty nails :(


Maleficent is a stunning purple glitter polish with lots of holo sparkle with scattered splashes of red. Written description really doesn't do this polish justice, so just oogle the photos below!


RIP long nails. This line is no longer available on Color4Nails (which is good, I probably would have bought the rest of them if they were!) but be sure to sign up for their email updates so you can be prepared for restocks!

Wednesday, January 22, 2014

Tutorial: Gradient 101

I love doing gradients. It's fun to mix colors, they add complexity to even the simplest nail art, and are really fun (and easy!) to do. I posted the gradient below on my Instagram last week, and got an overwhelmingly positive response. A lot of the success of this gradient is due to choosing colors that go well together, and fade naturally, but I must admit that I've done enough gradients to have come up with a few tips and tricks that might help others. So, I decided to put together a gradient tutorial!


I realize everyone and their mom has either made or used another gradient tutorial at some point, but like I said, I've come up with some variations on what I followed when I first got started, and why not throw my hat in the ring. If you're in a hurry, you can just take a look at the pictorial below, but I really recommend reading the detailed steps beneath the photo.


Supplies: make up sponge, clean up brush, pure acetone, polish/acrylic paint for gradient, white/light neutral polish for base, quick drying top coat

Step 1: Paint your base color.
If the "first" color of your gradient (the color closest to your cuticle) is a very light or neutral color, (as shown in the pictorial and photo below) start out by painting your entire nail that color. If your're doing a gradient of all dark, bright, or neon colors, start with a white base--it will make your colors pop. Then, top with a quick drying top coat. This will keep your makeup sponge from sticking to your base!

Step 2: Paint your gradient colors on your makeup sponge.
Paint all the colors in your gradient in thin, barely touching lines directly onto the makeup sponge. If you used one of your gradient colors as your base, paint that color on the sponge too--this will help with blending.

Step 3: Apply sponge to nail.
Gently sponge the painted side of the sponge onto your nail several times, ensuring that the color is applied across the entire width of your nail. I will usually sponge press the sponge down 5-8 times, depending on which nail and how wide it is. Sponging repeatedly (rather than just one) will help you blend the colors.

Steps 4 & 5: Repeat!
Don't worry if your colors are faint or sheer after the first sponged coat. Trying to continually apply the same coat of polish will not help, and will probably end up lifting some of the polish you've already applied! Instead, let the first coat dry completely, then paint a new coat of polish onto your sponge, and apply multiple coats. Here I've done three, but it has taken up to five coats for me to do this in the past! Sponging on color in multiple coats won't build up as quickly as applying multiple coats normally, so you don't really have to worry about the polish getting thick or goopy. 

Step 6: Clean up, top coat, and embellish!
Dip a small make up brush (I love the elf small concealer brush, available at Target for $1) into pure acetone to clean up the skin surrounding your nail. I absolutely do NOT recommend using pure acetone for normal polish removal--it is extremely drying, and will just make your nails sad. But, for targeted cuticle clean up, it's definitely the most efficient route. Once you've removed the excess polish from your skin, apply a coat of your quick drying top coat. This will seal in your mani, and also help (slightly) with blending the colors. Finally, if you want to, embellish your mani with studs or glitter!


Ta da! You're all set with an eye catching mani! 

What do you think? Do you have any secret tips for achievement the perfect gradient? 
Monday, January 20, 2014

The Nail Rock Glitter Sequin Kit

Happy MLK Day! It's very rare that I have a holiday from both work AND school, so I'm really enjoying my long weekend...by doing lots of nail looks! Today I used one of my Birchbox samples, The Nail Rock glitter sequin kit, to create one of my most sparkly accent nails yet!


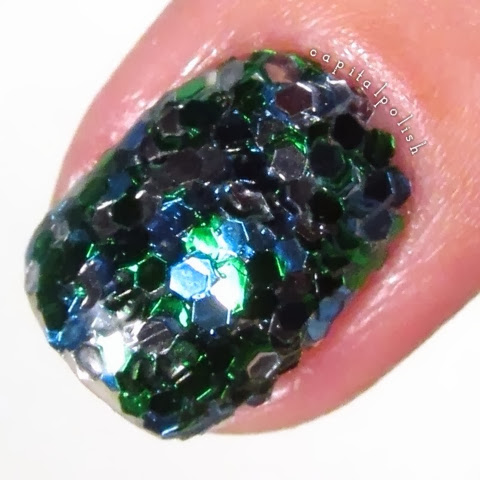
The Nail Rock kit comes with a pot of glitter, (mine was a mixture of green, aqua, and silver) a special glitter-grabbing base coat, and a brief set of instructions. I applied one coat of the base coat over my normal base of Nailtiques 2, then rolled my finger in the glitter pot. I used my regular clean up brush to brush away excess glitter, then topped with HK Girl Topcoat to seal everything in and give it a high gloss. I paired this outrageous accent nail with a somewhat subdued gradient of Zoya Chantal and Hunter, and added circular silver studs from the Born Pretty Store. 


Though I'm not totally crazy about these two looks in combination, (the greens matched MUCH better in my head!) I do enjoy them independently. I've never done a full loose-glitter nail accent before, and it's a really simple way to get a super fabulous look. I do like the combination of glitter, and it was a good size for this type of application, and could also be used in glitter placement. The base coat that comes in the kit smells AWFUL, almost like superglue. It picked up a lot of glitter, but it took a long time to dry and gave me a headache. If I try this again, I will probably just use my normal basecoat. Also, by that logic, you're probably better off just buying individual pots of loose glitter (available for cheap from craft stores or the Born Pretty Store) rather than dropping $7 on this kit. 

Macro shot of my glitter nail. Again, I do like the look, and I'll probably do it again, and even look into buying more loose glitter to experiment. The base coat that came with the kit is going in the trash.

The Nail Rock glitter sequin kit is available from Birchbox, and comes in a few other colors and finishes, including velvet and microglitter. If you're interested in receiving monthly samples from Birchbox for only $10, sign up here!

Saturday, January 18, 2014

NOTD: Super Sparkly Half Moons

Good evening, nail babes! I did this incredibly glittery mani today to celebrate my (male) roommate's birthday...I'm not sure he'll appreciate it, but I hope you all will!


I used two of my untried polishes in this mani: Mermaid Lacquer - Shop Til You Drop and Zoya - Aurora. They turned out to be a totally glitterific combination.


Shop Til You Drop has a UV color changing base that goes from a light grey-purple to a bright purple in the sun and is packed with pink, purple teal, and holo silver glitters in various shapes. Since I did this so late, I'll try to get a sun shot of this tomorrow; these photos show three thin coats of STYD (on my middle and ring finger) in its indoor state. Jacquelynn of Mermaid Lacquer is AMAZING at packing her polishes with tons of fun glitter, and this one has just shot to the top of my favorites of hers. It's uncanny how much and what a huge variety of glitter applies with each brushstroke--absolutely no fishing necessary!


Aurora is a plum crelly polish with lots of holo glitter. I have a dismally low number of Zoyas in my collection, but I'm so glad to have added this one. Formula was fantastic; this photo shows two coats on my index and pinky finger.


And now for the macros! Just look at all those glitters, including the big and medium sized dots, my absolute favorite!


To achieve this look, I started by applying two coats of Aurora to my thumb, index, and pinky fingers, and three coats of Shop Til You Drop on my middle and ring fingers. I then used french tip guides to create a half moon using Aurora on my middle and ring fingers, then sponged on a gradient of STYD onto my thumb, index, and pinky fingers. Then I sealed everything with a generous coat of HK Girl Topcoat.


I think this is an appropriately celebratory look! Glitter makes everything better :) Have fabulous Saturday night, ladies!